2024/02/18
Unclouding Xiaomi Air Purifiers
Motivation and Background
I recently bought an used Xiaomi Air Purifier (Model 3C) which is, like most modern devices with a cable, “smart”. Unfortunately manufacturers and their customers associate this with having a proprietary app that communicates with a proprietary cloud. While an air purifier is not the most valuable thing to have in any home automation you should at least setup such a device is that it has an unprotected AP open over which the initial configuration can be done. If you do don’t do that, your neighbor might claim your device and start controlling it. And of course it is always nice to be able to control things remotely 😉.
After resetting the device several times, obtaining an auth token that you need to control the device locally and having it connect to my dedicated home automation VLAN/Wifi, I was never able to connect to it. It always attempted to connect to the Xiaomi Cloud using various way (UDP, TCP, HTTP OTA) but requests using the token obtained previously were met with silence GitHub Issue with people reporting similar issues with different devices. This was not always the case as there are reports of people being able to setup their device in Home Assistant without a Xiaomi account / the device phoning home. It seems like that the token is refreshed after the intial configuration / after joining the “customer’s wifi”.
I almost gave up on the idea of getting the device into my Home Assistant installation but then I found
several repositories that
are replacing the Xiaomi firmware of the ESP32 within the device with ESPHome.
The device itself contains two microcontrollers, a STM32 that controls the device (motor, sensors) and an ESP32
that is the gateway to the Xiaomi cloud / the local network.
Both microcontrollers communicate using the Miot serial protocol where the
STM32 reports changed properties such as air quality or temperature to the ESP32 which in turn sends commands
such as set rotor speed to maximum.
This makes it perfectly safe and easy to replace the ESP32 fireware as the functional aspects of the machine remain
untouched.
What follows it the documentation how to free a Xiaomi Air Purifier 3C from its proprietary firmware.
Documentation
Disclaimer: You are modifying the device at your own risk.

a Xiaomi Air Purifier 3C
Opening up
Remove the filter, turn the top upside down and loosen all the screws. Carefully remove the cover, unplug the JST connector for the safety switch. You will be met by this view.
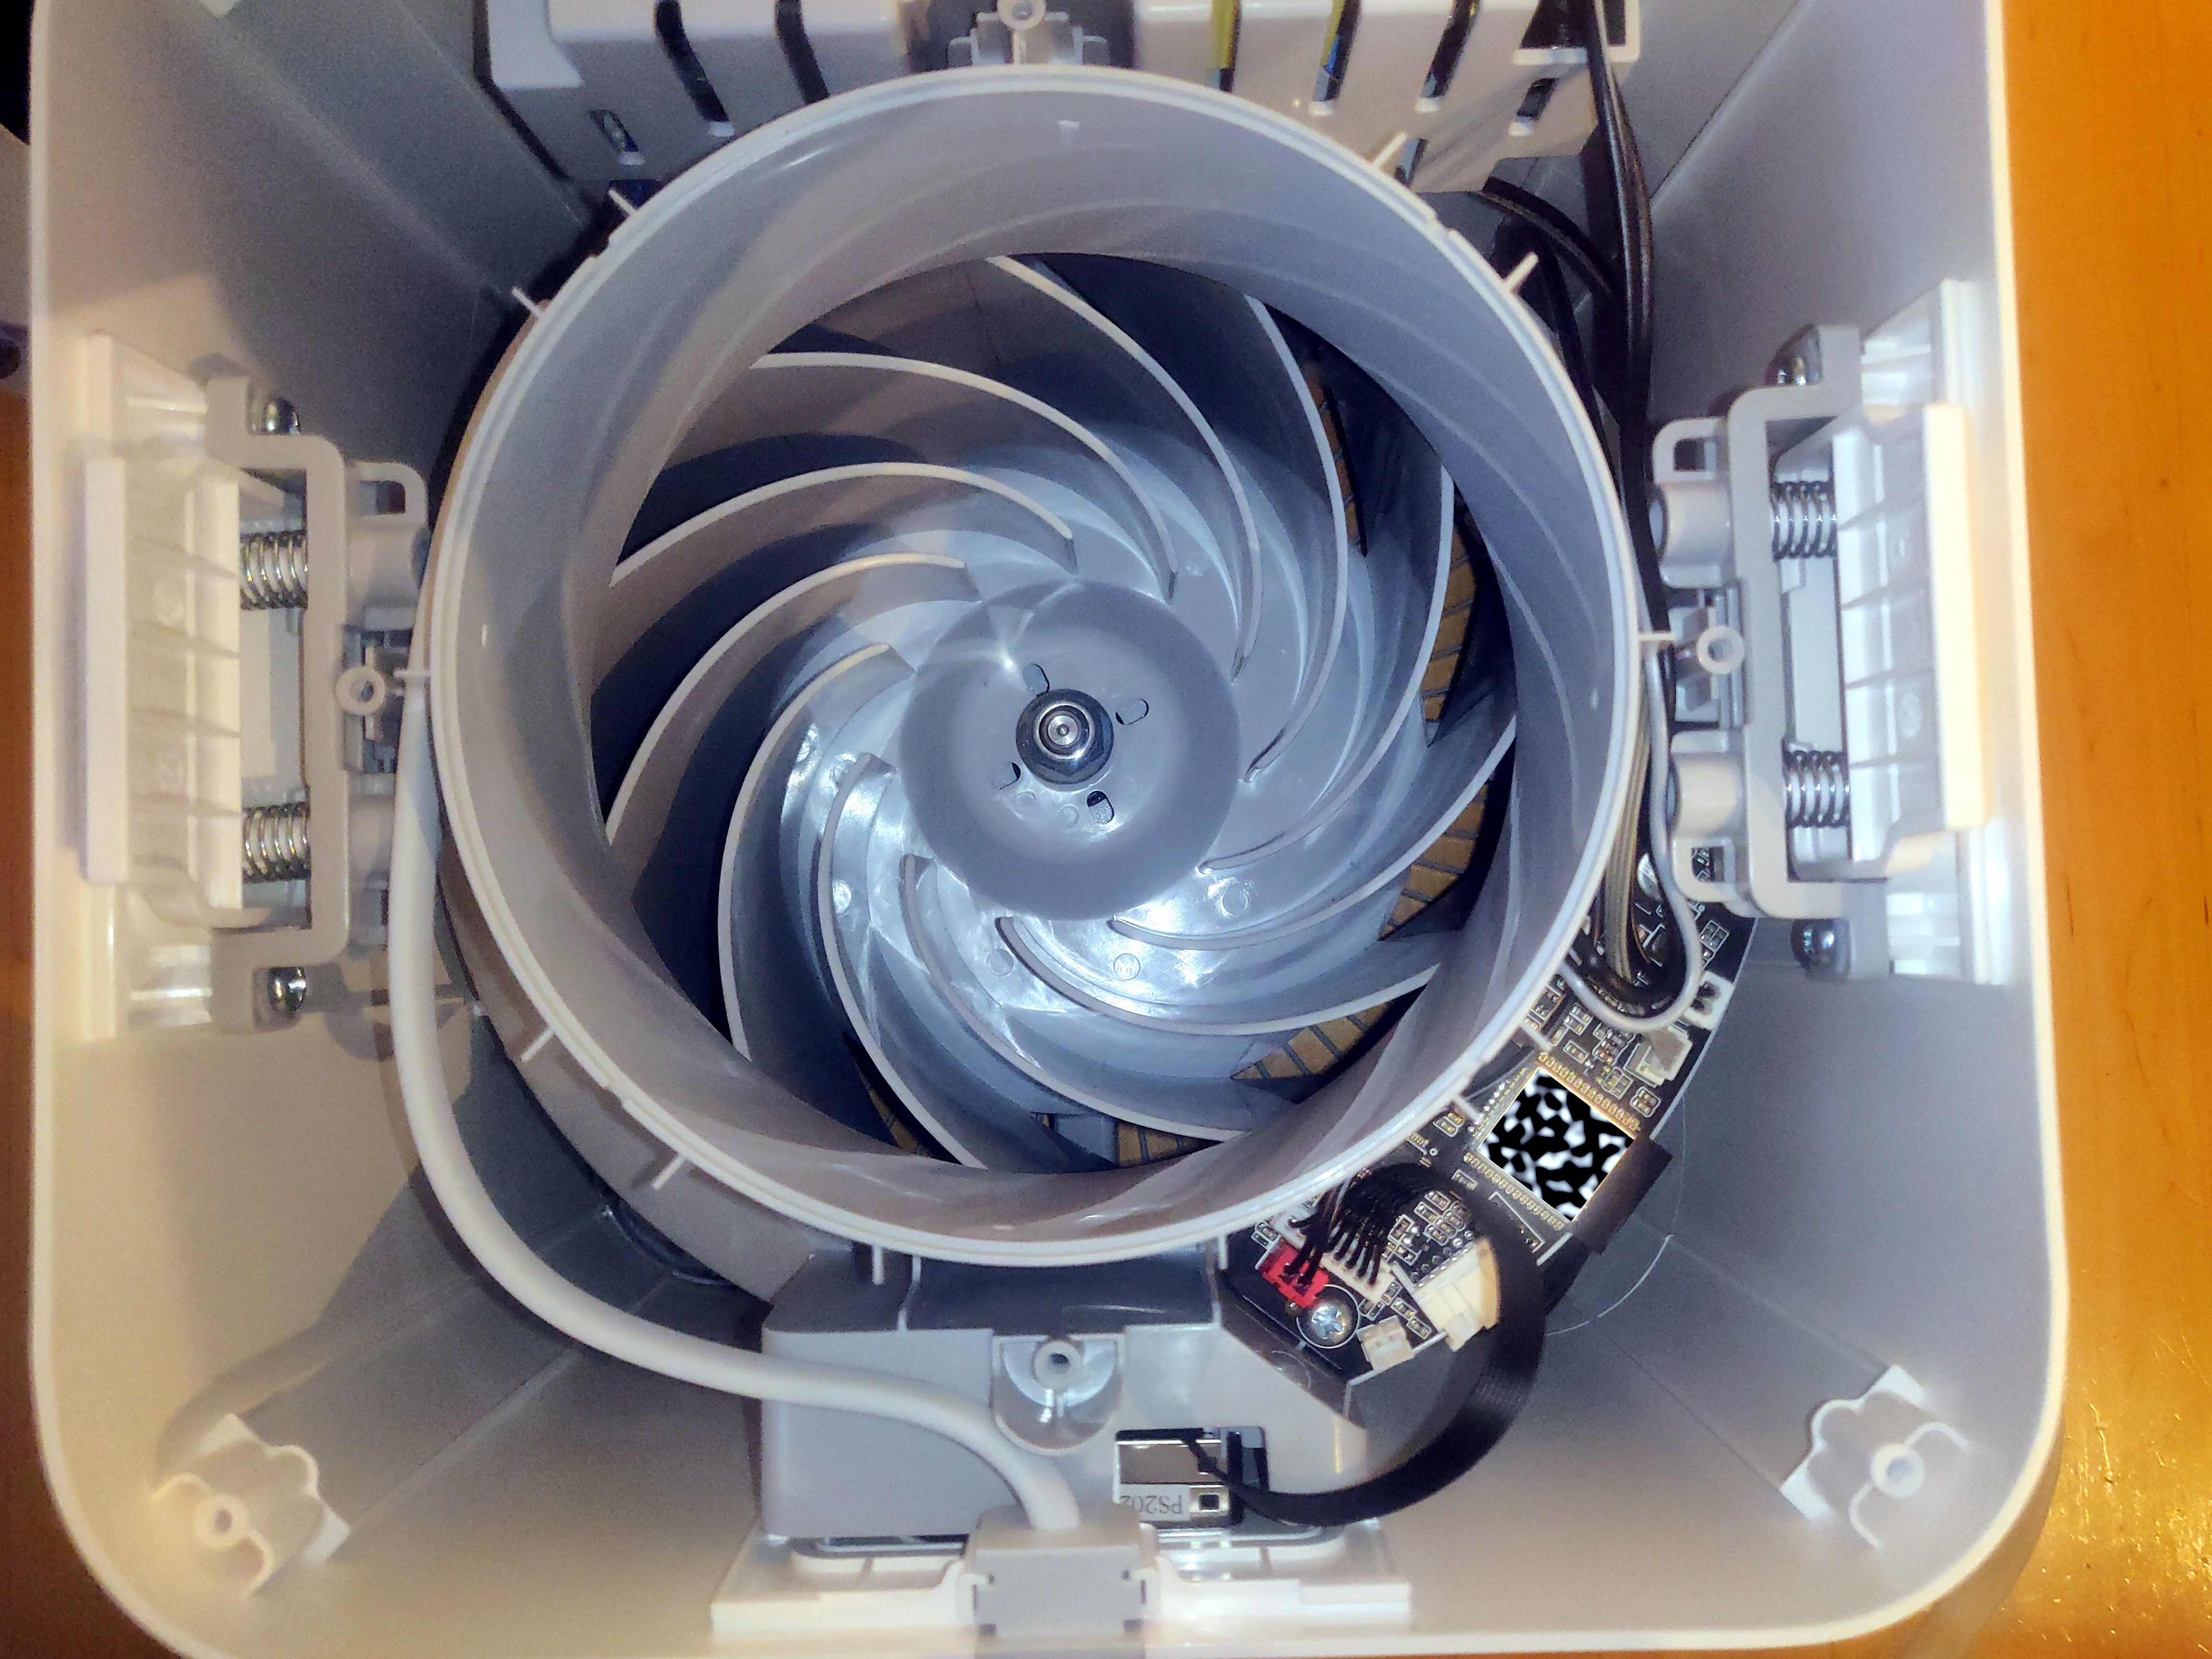
inside view of the Xiaomi Air Purifier 3C
Connect the programmer
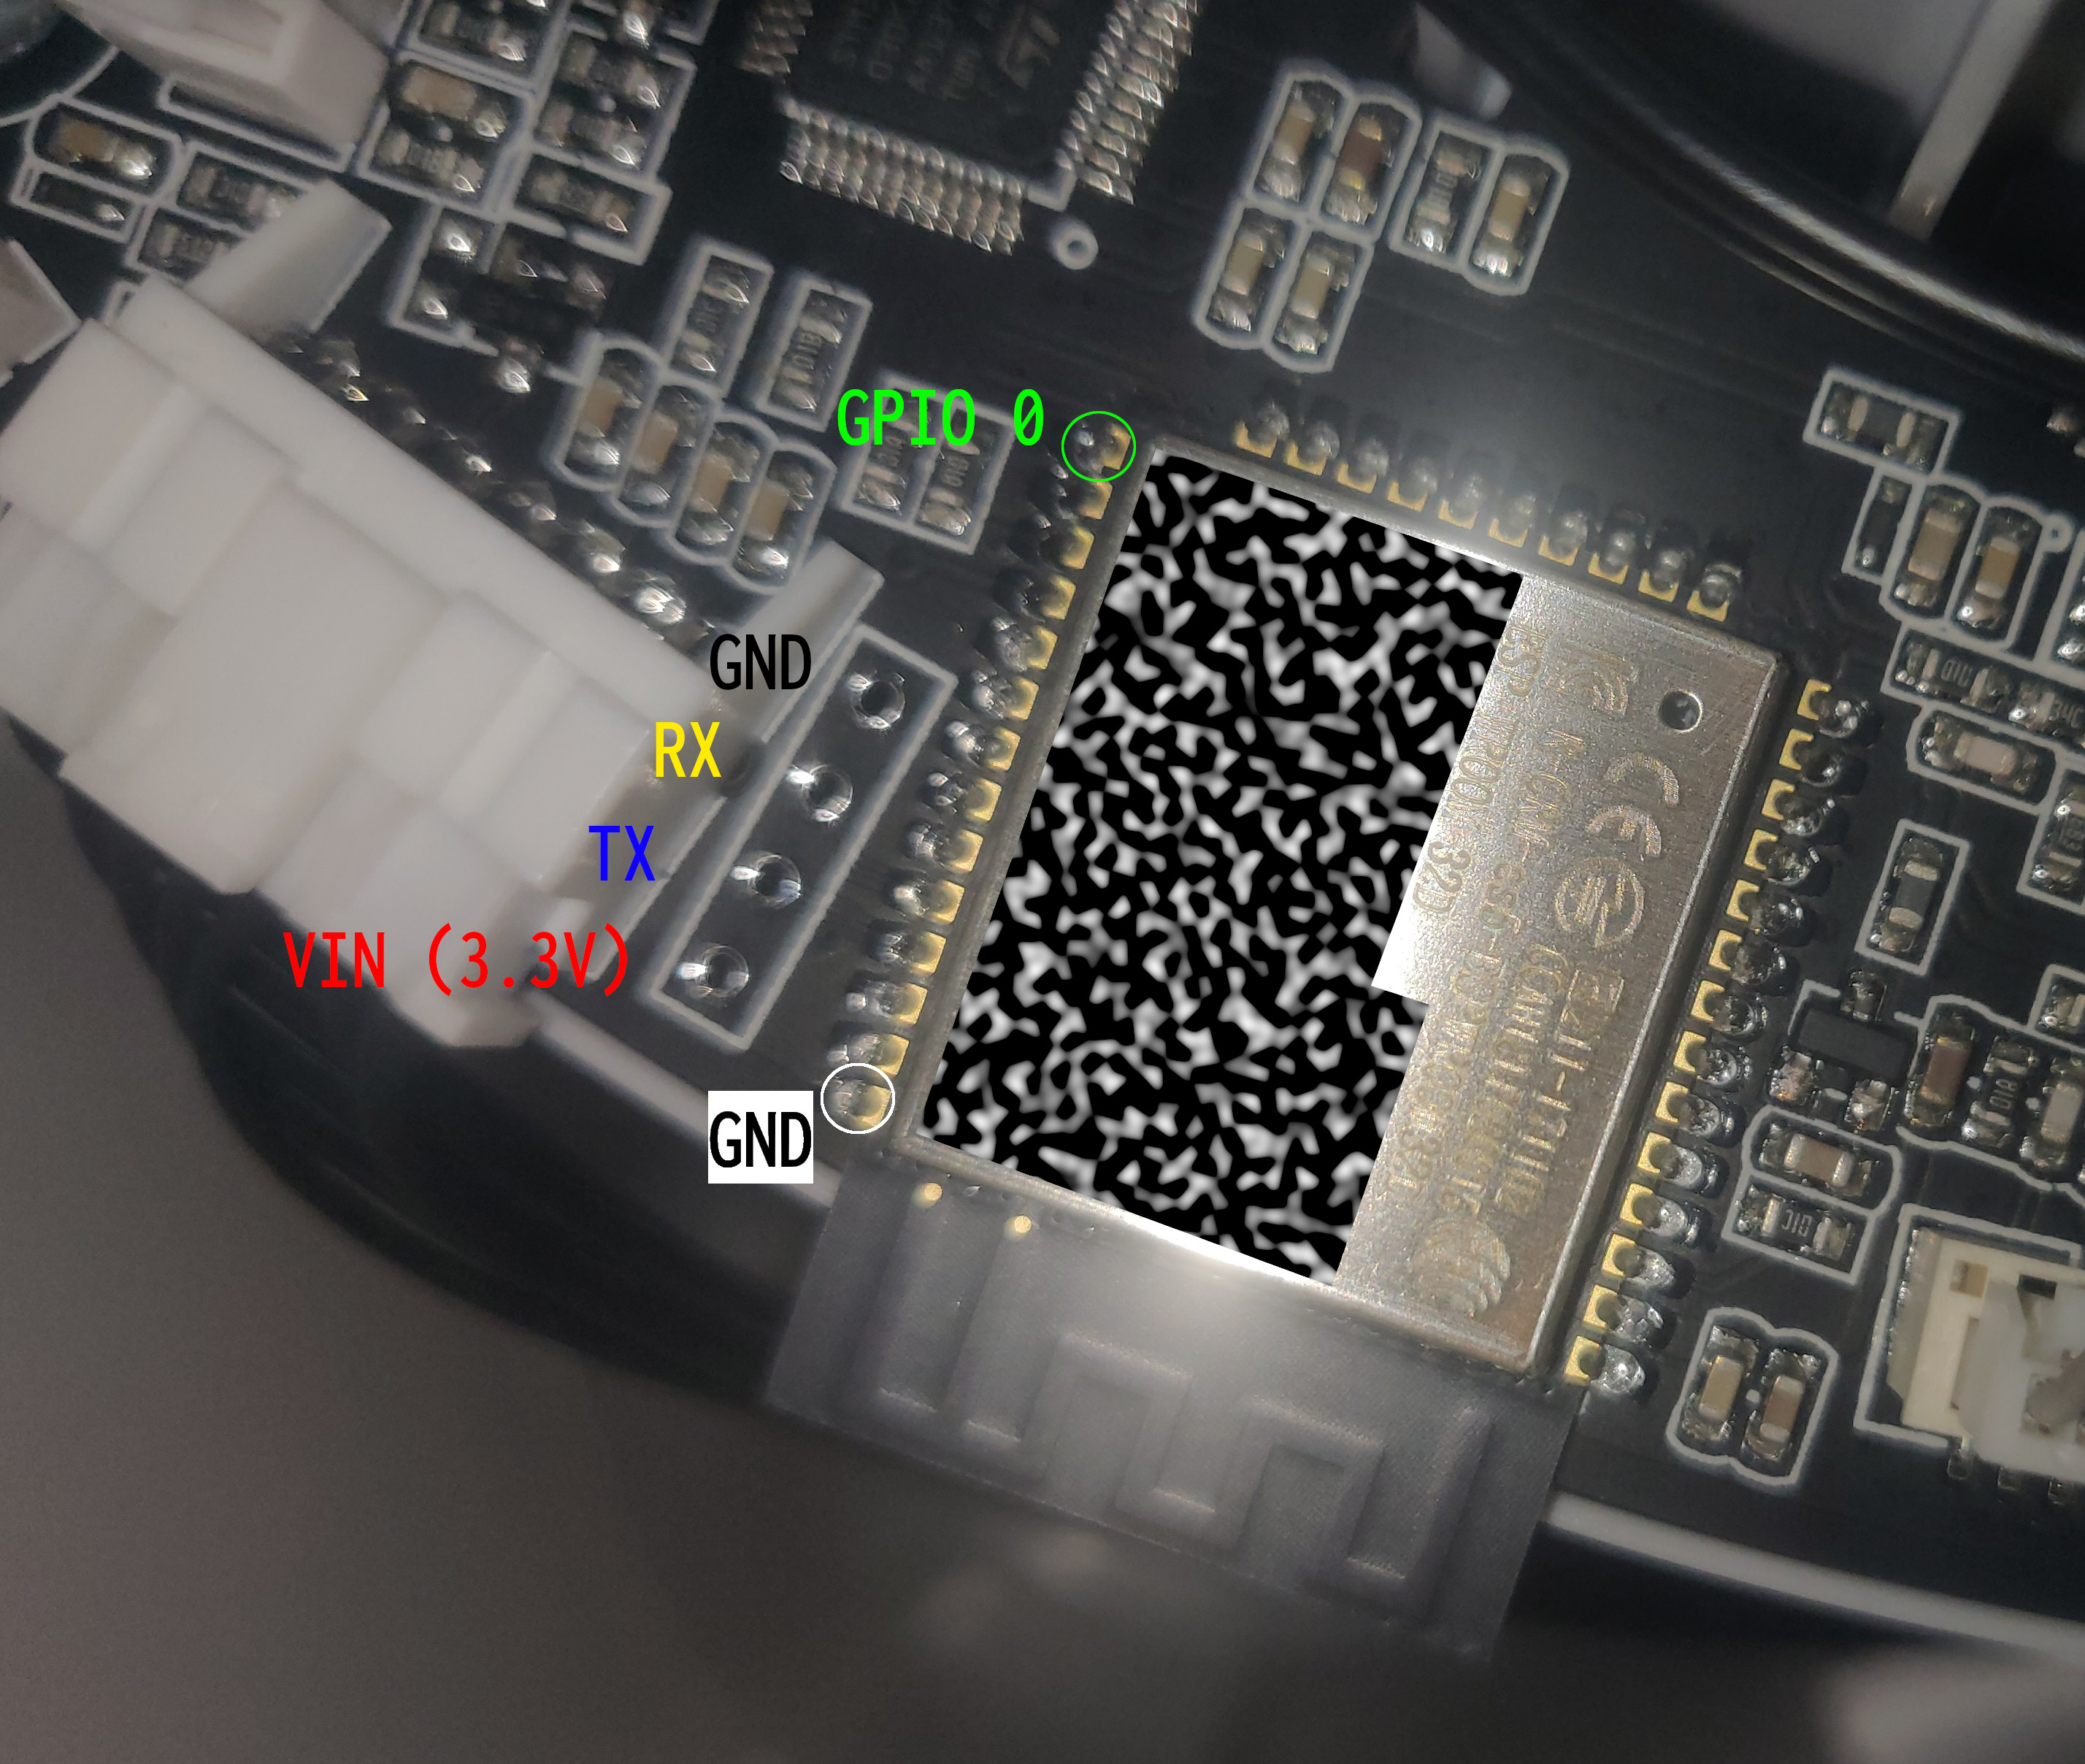
pinout at the ESP32
Use a 4x1 pin header, connect 3.3V, RX, TX and GND of a UART-USB programmer according to the picture above, connecting
the RX side of the programmer to the TX pin shown in the picture and vice versa for the other pin.
Then plug the pin header into the holes, no need for soldering!
Connect the programmer to your workstation. Run an application to read the serial output, like minicom -D /dev/ttyUSB0.
You should see some output of the firmware refusing to boot.
rst:0x1 (POWERON_RESET),boot:0x13 (SPI_FAST_FLASH_BOOT)
configsip: 0, SPIWP:0xee
clk_drv:0x00,q_drv:0x00,d_drv:0x00,cs0_drv:0x00,hd_drv:0x00,wp_drv:0x00
mode:DIO, clock div:2
load:0x3fff0018,len:4
load:0x3fff001c,len:6316
load:0x40078000,len:9584
load:0x40080000,len:6272
entry 0x4008038c
I (29) boot: ESP-IDF cef6c09-dirty 2nd stage bootloader
I (29) boot: compile time 19:14:10
I (29) boot: Enabling RNG early entropy source...
I (34) boot: SPI Flash RID  : 0x1C7016
I (38) boot: SPI Flash  MF  : 0x1C
I (43) boot: SPI Flash  ID  : 0x7016
I (47) boot: SPI Speed      : 40MHz
I (51) boot: SPI Mode       : DIO
I (55) boot: SPI Flash Size : 4MB
I (59) boot: Partition Table:
I (63) boot: ## Label            Usage          Type ST Offset   Length
I (70) boot:  0 nvs              WiFi data        01 02 00009000 00004000
I (77) boot:  1 otadata          OTA data         01 00 0000d000 00002000
I (85) boot:  2 phy_init         RF data          01 01 0000f000 00001000
I (92) boot:  3 miio_fw1         OTA app          00 10 00010000 00160000
I (100) boot:  4 miio_fw2         OTA app          00 11 00170000 00160000
I (107) boot:  5 test             test app         00 20 002d0000 00013000
I (115) boot:  6 mimcu            Unknown data     01 fd 002e3000 00100000
I (122) boot:  7 coredump         Unknown data     01 03 003e3000 00010000
I (130) boot:  8 minvs            Unknown data     01 fe 003f8000 00004000
I (138) boot: End of partition table
I (142) boot: No factory image, trying OTA 0
I (147) esp_image: segment 0: paddr=0x00010020 vaddr=0x3f400020 size=0x29818 (170008) map
I (215) esp_image: segment 1: paddr=0x00039840 vaddr=0x3ffc0000 size=0x033a8 ( 13224) load
I (221) esp_image: segment 2: paddr=0x0003cbf0 vaddr=0x3ffc33a8 size=0x003c0 (   960) load
I (223) esp_image: segment 3: paddr=0x0003cfb8 vaddr=0x40080000 size=0x00400 (  1024) load
I (232) esp_image: segment 4: paddr=0x0003d3c0 vaddr=0x40080400 size=0x02c50 ( 11344) load
I (245) esp_image: segment 5: paddr=0x00040018 vaddr=0x400d0018 size=0xe8a04 (952836) map
I (583) esp_image: segment 6: paddr=0x00128a24 vaddr=0x40083050 size=0x144c0 ( 83136) load
I (632) boot: Loaded app from partition at offset 0x10000
I (632) boot: Disabling RNG early entropy source...
I (632) cpu_start: Pro cpu up.
I (636) cpu_start: Single core mode
I (641) heap_init: Initializing. RAM available for dynamic allocation:
I (647) heap_init: At 3FFAFF10 len 000000F0 (0 KiB): DRAM
I (653) heap_init: At 3FFD1960 len 0000E6A0 (57 KiB): DRAM
I (659) heap_init: At 3FFE0440 len 00003BC0 (14 KiB): D/IRAM
I (666) heap_init: At 3FFE4350 len 0001BCB0 (111 KiB): D/IRAM
I (672) heap_init: At 40097510 len 00008AF0 (34 KiB): IRAM
I (678) cpu_start: Pro cpu start user code
I (26) cpu_start: Starting scheduler on PRO CPU.
08:00:00.020 [D] Addon: miIO
08:00:00.020 [D]        : 0x400e20b8:   bind_stat
08:00:00.020 [D]        : 0x400e406c:   bleGetNearbyBandList
08:00:00.020 [D]        : 0x400e3fbc:   bleStartSearchBand
08:00:00.030 [D]        : 0x400e4098:   ble_gateway_enable
08:00:00.030 [D]        : 0x400e1998:   config_router
08:00:00.040 [D]        : 0x400e1a8c:   config_router_safe
08:00:00.040 [D]        : 0x400e1f74:   disable_local_restore
08:00:00.050 [D]        : 0x400d9598:   dyna_params
08:00:00.050 [D]        : 0x400e2004:   get_disable_local_restore
08:00:00.060 [D]        : 0x400da8ac:   get_ota_progress
08:00:00.070 [D]        : 0x400da548:   get_ota_state
08:00:00.070 [D]        : 0x400db8f0:   handshake
08:00:00.080 [D]        : 0x400d9d80:   help
08:00:00.080 [D]        : 0x400d7628:   info
08:00:00.080 [D]        : 0x400d6b8c:   iperf_client
08:00:00.090 [D]        : 0x400e20d0:   migration
08:00:00.090 [D]        : 0x400d94ac:   ncinfo
08:00:00.100 [D]        : 0x400da23c:   ota
08:00:00.100 [D]        : 0x400da9c0:   ota_install
08:00:00.110 [D]        : 0x400da09c:   reboot
08:00:00.110 [D]        : 0x400d9950:   redirect
08:00:00.120 [D]        : 0x400e1f10:   restore
08:00:00.120 [D] Addon: user
08:00:00.130 [D]        : 0x400e20a0:   bind_key
08:00:00.130 [D]        : 0x400d521c:   hello
08:00:00.130 [D] Addon: init complete
08:00:00.140 [D] httpc: idle
08:00:00.140 [D] arch_os: create handle = 3ffd9964, name = httpc_task, prio = 10
08:00:00.160 [D] otu: otu is idle...
08:00:00.160 [D] arch_os: create handle = 3ffdabc4, name = otu_task, prio = 10
08:00:00.160 [D] ots: ots is idle...
08:00:00.170 [D] arch_os: create handle = 3ffdbe24, name = ots_task, prio = 10
08:00:00.180 [I] miio_ot: httpdns enabled
08:00:00.190 [I] miio_ot: dlg enabled
08:00:00.190 [D] ots: event on[id=1]
08:00:00.190 [D] ots: event on[id=5]
08:00:00.190 [D] ots: event on[id=9]
08:00:00.200 [D] ots: event on[id=10]
08:00:00.200 [D] ot: event on[id=1]
08:00:00.210 [D] ot: event on[id=2]
08:00:00.210 [D] ot: event on[id=3]
08:00:00.210 [D] ot: event on[id=4]
08:00:00.220 [D] otu: event on[id=2]
08:00:00.220 [D] otu: event on[id=3]
08:00:00.230 [D] otu: event on[id=4]
08:00:00.230 [D] otu: event on[id=5]
08:00:00.240 [D] otu: event on[id=6]
08:00:00.240 [D] otu: event on[id=7]
08:00:00.240 [D] otu: event on[id=8]
08:00:00.250 [D] otu: event on[id=9]
08:00:00.250 [D] otu: event on[id=10]
08:00:00.260 [D] otu: event on[id=11]
08:00:00.260 [D] otu: event on[id=12]
08:00:00.270 [D] otu: event on[id=14]
08:00:00.270 [D] ots: event on[id=2]
08:00:00.280 [D] ots: event on[id=3]
08:00:00.280 [D] ots: event on[id=4]
08:00:00.280 [D] ots: event on[id=5]
08:00:00.290 [D] ots: event on[id=6]
08:00:00.290 [D] ots: event on[id=7]
08:00:00.300 [D] ots: event on[id=8]
08:00:00.300 [D] ots: event on[id=9]
08:00:00.310 [D] ots: event on[id=10]
08:00:00.310 [D] ots: event on[id=11]
08:00:00.310 [D] ots: event on[id=12]
08:00:00.320 [D] arch_os: create handle = 3ffdd9f8, name = mi_otn, prio = 10
I (709) BTDM_INIT: BT controller compile version [382a548]
Getting into the bootloader
While still checking the output, connect GPIO0 and GND using a wire. Again, no need to solder! Once you see that the bootloader has been loaded, you can put the wire aside.
Dump original firmware
Just to be sure, dump your current firmware.
$ esptool.py read_flash 0x00000 0x400000 purifier_flash_4M.binBuild ESPHome
Create a new folder or reuse your esphome project folder, ⭐ and clone this repository,
create a new file named secrets.yaml or extend your existing one with the following content.
wifi_ssid: YourWifiSSID
wifi_password: YourWifiPSK
wifi_ap_password: WifiPSKForBackupAP
api_encryption_key: d0H+GHC9Jau84wWmEfegFnXBfZuK3eqvtsPETSmAaq8= # CHANGEME
ota_password: otapassword123
secrets.yaml
Link the base config to the main folder:
$ ln -s esphome-miot/config/zhimi.airp.mb4a.yaml .Create a file for the new device:
---
substitutions:
  name: purifier-3c-1
  name_upper: Purifier 3C

<<: !include zhimi.airp.mb4a.yaml
my_purifier.yaml
Build the firmware
$ esphome compile my_purifier.yamlMake sure that your esphome version is up-to-date or the firmware will not compile.
I used 2023.12.9.
Flashing
Once you are done, make sure that the ESP32 is still in bootloader mode.
You can use esphome run but I did it manually using esptool.py.
For that, run withing .esphome/build/my_purifier/.pioenvs/my_purifier
cd .esphome/build/my_purifier/.pioenvs/my_purifier
esptool.py write_flash 0x8000 partitions.bin
esptool.py write_flash 0x1000 bootloader.bin
esptool.py write_flash 0x10000 firmware.bin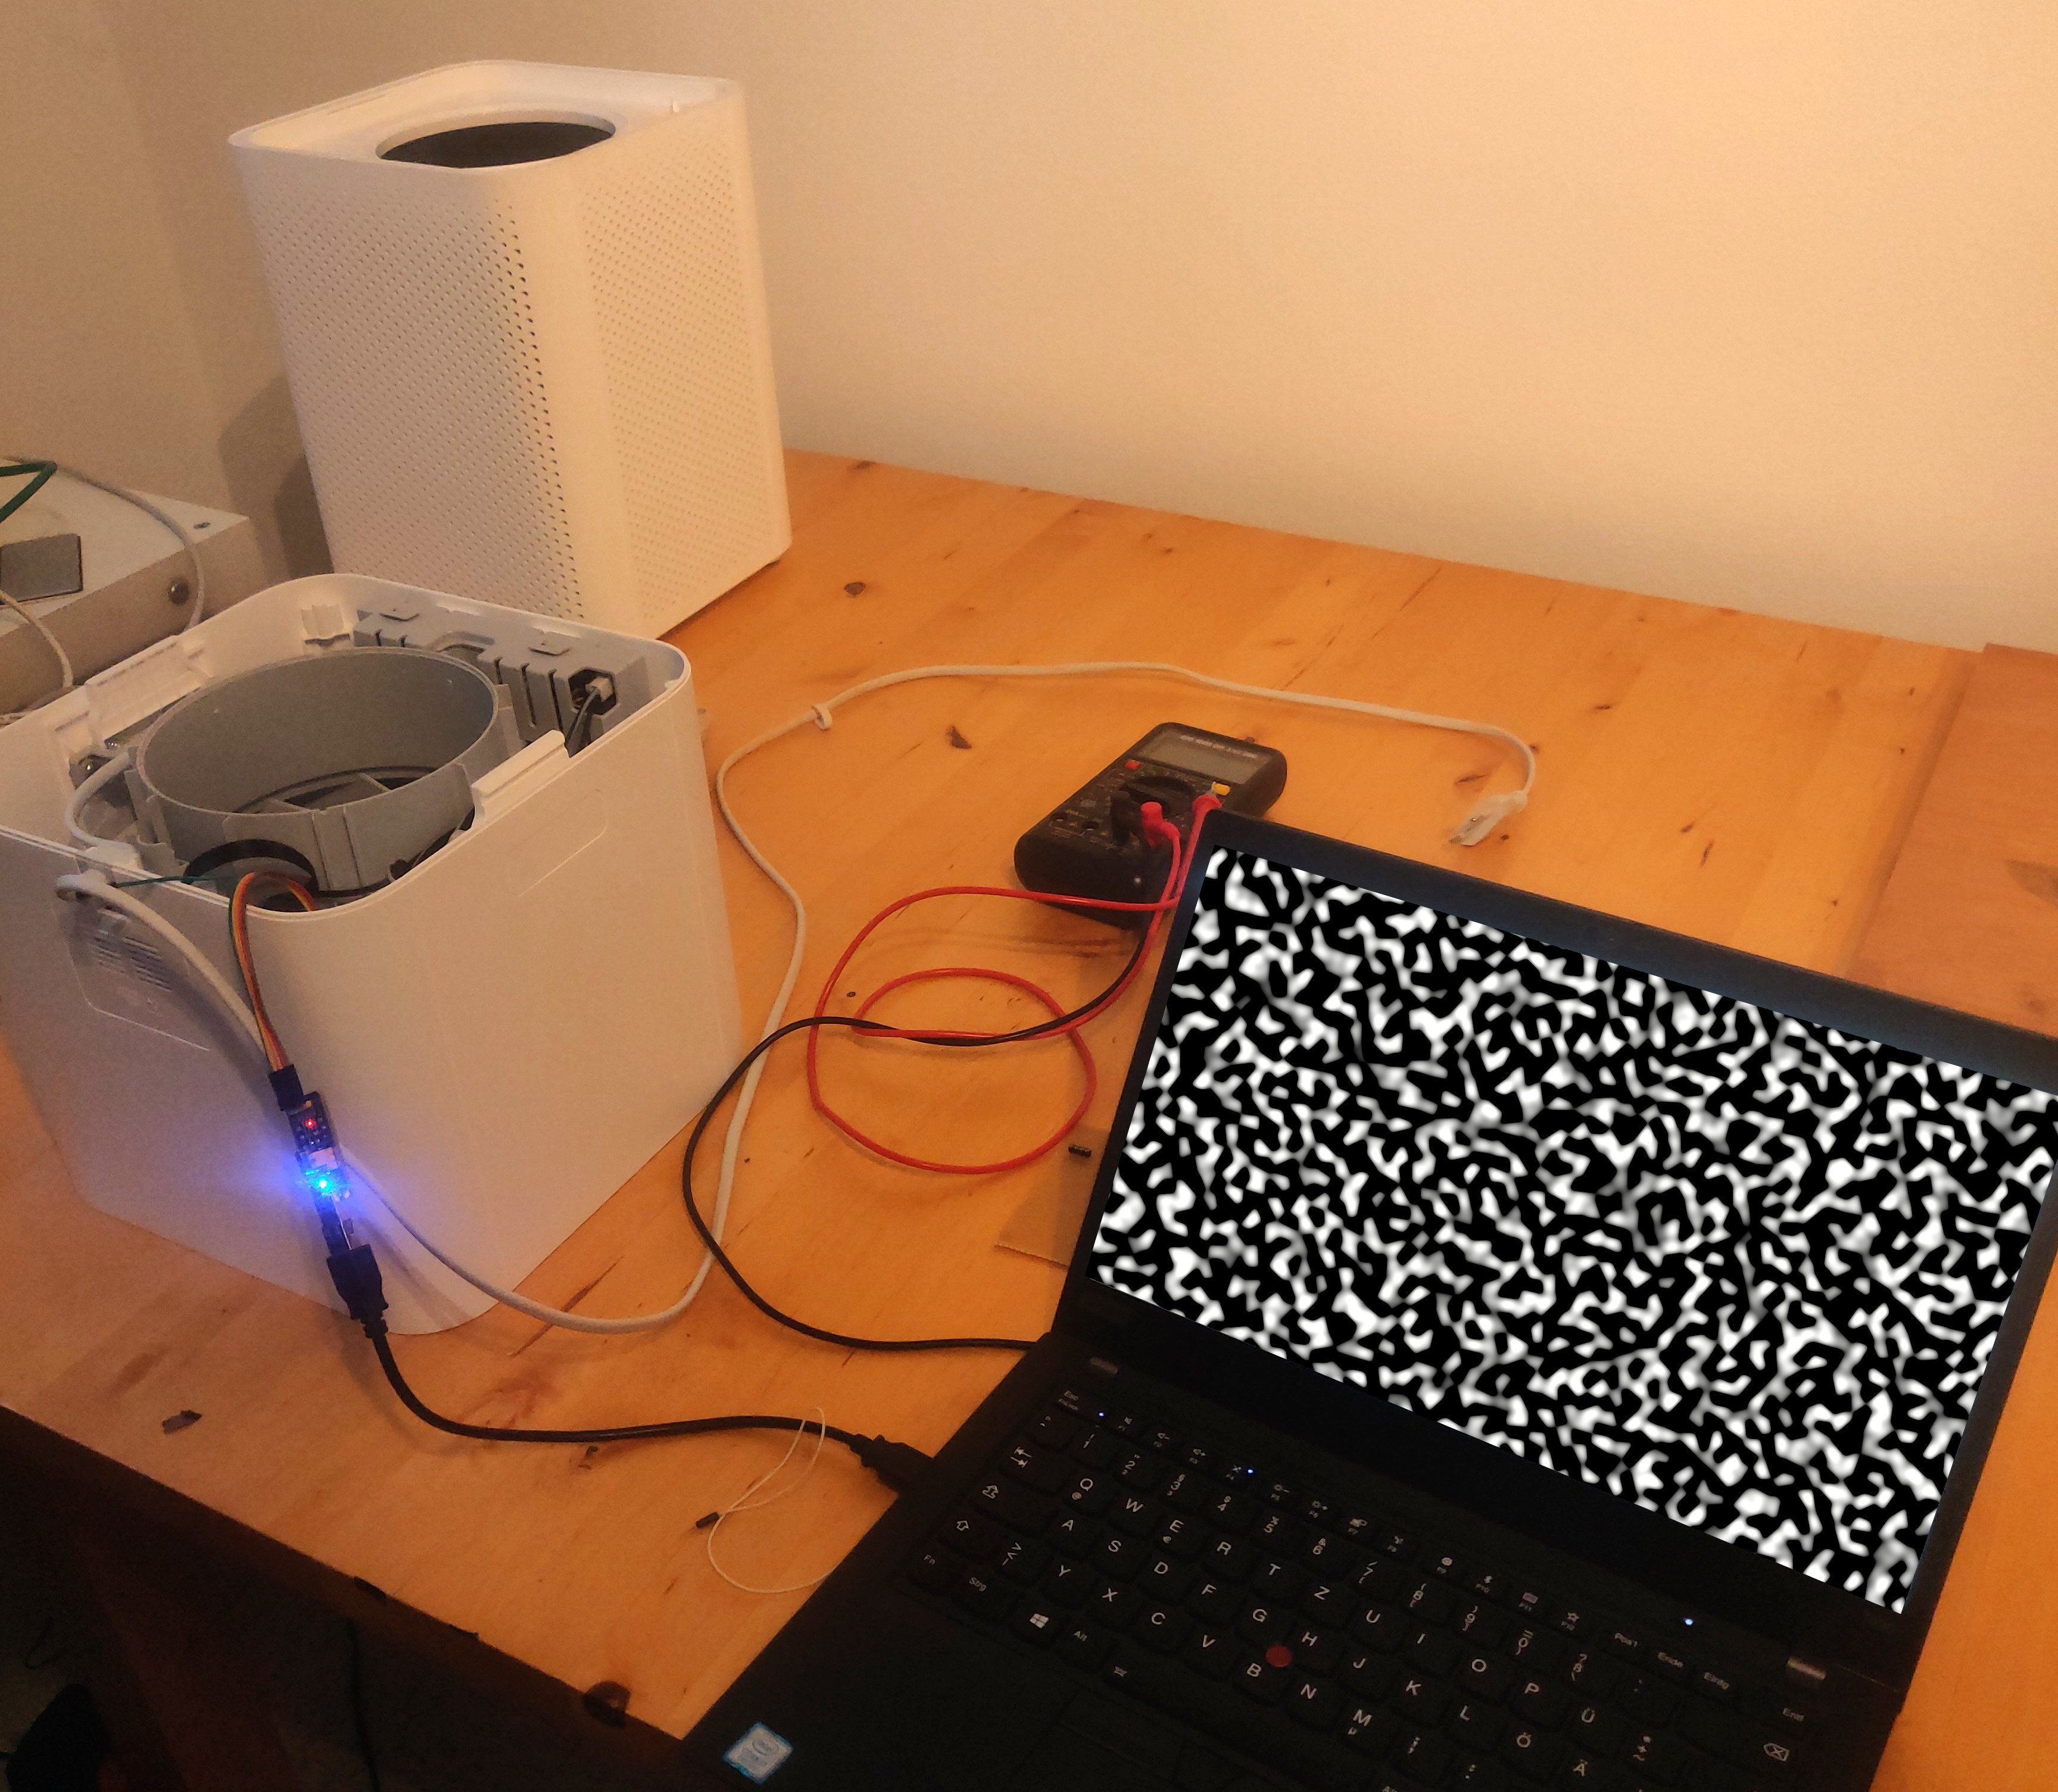
Buckle your seatbelt Dorothy, 'cause Kansas is going bye-bye!
Unplug the programmer / 3.3V to reset the ESP32, using minicom you should now be able to observe
ESPHome booting.
If you want, you can short the two pins on the JST port you disconnected previously and plug the unit into the mains to test everything
before putting the device together again.
After testing, disconnect the device from the mains, disconnect the programmer. Then do the steps in reverse that were required to unbuild it. Do not forget the JST connector!
ESPHome and HomeAssistant
You should give the device a static DHCP lease in your router. Afterwards add it in Home Assistant.
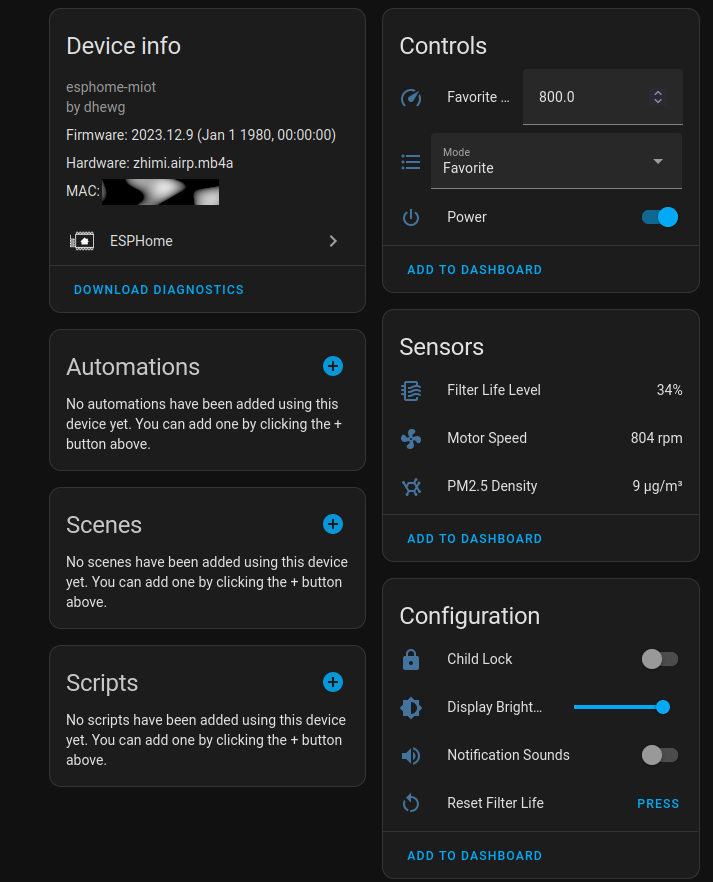
the liberated air purifier in Home Assistant
You can now control the Xiaomi Air Purifier 3C using Home Assistant and ESPHome!
Credits
Thanks to @dhewg et al. for the implementation!