2025/02/28
Personal Smart Meter Gateway
In this post I show how to build a compact, battery-powered device that feeds the data of your digital energy meter into Home Assistant / MQTT.
a battery powered smart meter gateway (SML reader)
Backstory
I once worked for an energy company that allowed owners of power plants (solar, water, wind, cogeneration) to share their energy with their neighbors. The goal was to use as little power from the grid i.e. increase their autonomy by shifting the usage of high power appliances (washing machine, charging electric cars, etc.) to times when the power plants were producing energy. The upside was not only a good feeling but also monetary as roughly speaking, no grid taxes are imposed on energy that is consumed within the same building. The high-tech approach is to invest a lot of money and time into automating everything and of course only buying “smart” devices. Alternatively, a consciousness of energy needs to be developed by the individual: a grasp how much energy each of devices consumes and how much energy the building produces on a given day and hour. For this we built a realtime app that featured the current consumption and production. The data came from many smart meters, one for each apartment and one for each power plant.
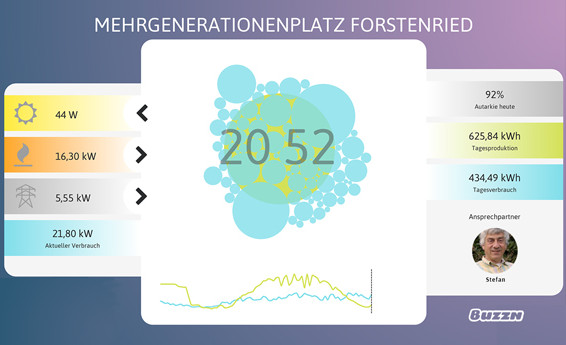
the app shows the current consumption and production of a whole building. each blue circle is a consumption unit, e.g. a flat
Since that moment, I wanted to replicate this in my own home, dog-fooding the idea instead of only implementing it for customers to experience first-hand whether the concept actually works. The energy meter of the flat I was living in, was far away in the basement so I needed to work with what was available to me: the wiring in the wiring cabinet of my flat. I used a RaspberryPi HAT that uses current clamps to measure the current going through the respective phase, then calculating the energy based on that. This allowed me to develop the consciousness above over some time but the technical implementation was impractical.
Since then I wanted to find an easier method. After moving to a different apartment, I had the opportunity to build a better solution that is also more attractive for others.

Look beyond your appliances and observe the patterns of their consumption!
Digital Meters and SML
Nowadays many households have digital energy meters. They hold the potential to do remote meter readings but also
smart grid steering and even new business and billing methods (e.g. hourly tariffs coupled to current energy exchange prices).
In Germany, most of these meters are currently just digital, not smart as they lack a uplink, the so-called smart meter gateway.
Even though the rollout seems quite flawed, at least in Germany,
the specification
of these meters have a surprising detail that empowers the individual: opposed to various remote transports such as wireless m-bus each
meter features an infrared LED that signals the current power and total consumption using an open protocol, the Smart Message Language.
The digital meter, when properly configured, sends key:value pairs, where the key is some well-known OBIS codes.
The goal is to forward the values to my local Home Assistant instance.
Requirements
battery powered: I do not have a power outlet available at the meter. So the device needs to be powered by a battery. In order to increase battery life, it needs to have a low power consumption. This may be achieved using deep sleep of a microcontroller. It wakes up, spends a minimum amount of time gathering the latest values, then goes back to sleep. To facilitate easy charging, it needs an on-board charging circuit.
Easy and fast integration: The device should be easy to integrate, no additional gateway must be used. It must be wireless and use no additional base station or gateways.
Minimum development effort: Existing components should be preferred instead of developing from scratch.
Attachable with a magnet: The digital meter has a steel plate that can be used to attach IR transceivers using a magnet.
Implementation
Given the requirements above, I have selected the ESP32-C3 XIAO board by SeeedStudio as it has a LiPo charger and good deep sleep capabilities. It will be running ESPhome which supports SML and will be using MQTT for transport. Using MQTT is crucial as the native ESPHome connection is initiated by Home Assistant, requiring the device to stay online until the connection occurs and the values can be sent, all while draining the battery. MQTT connections on the other hand are initiated by the device.
Cyberpunk Battery

Free Energy! Do you accept this quest?
For the battery sourcing, I took a long walk to find a thrown away e-cigarettes. China has already banned the sale and France and Belgium have followed. They are still legal in Germany and usually feature a LiPo cell ranging from 300mAh to 600mAh without a charging circuit. While probably economical for the manufacturers, a crazy waste of resources which you can salvage before they go to a landfill / are burned. Get them while you can :).
Receiver
I selected an off-the-shelf product that I found on eBay. For my meter, only the photo transistor is necessary.
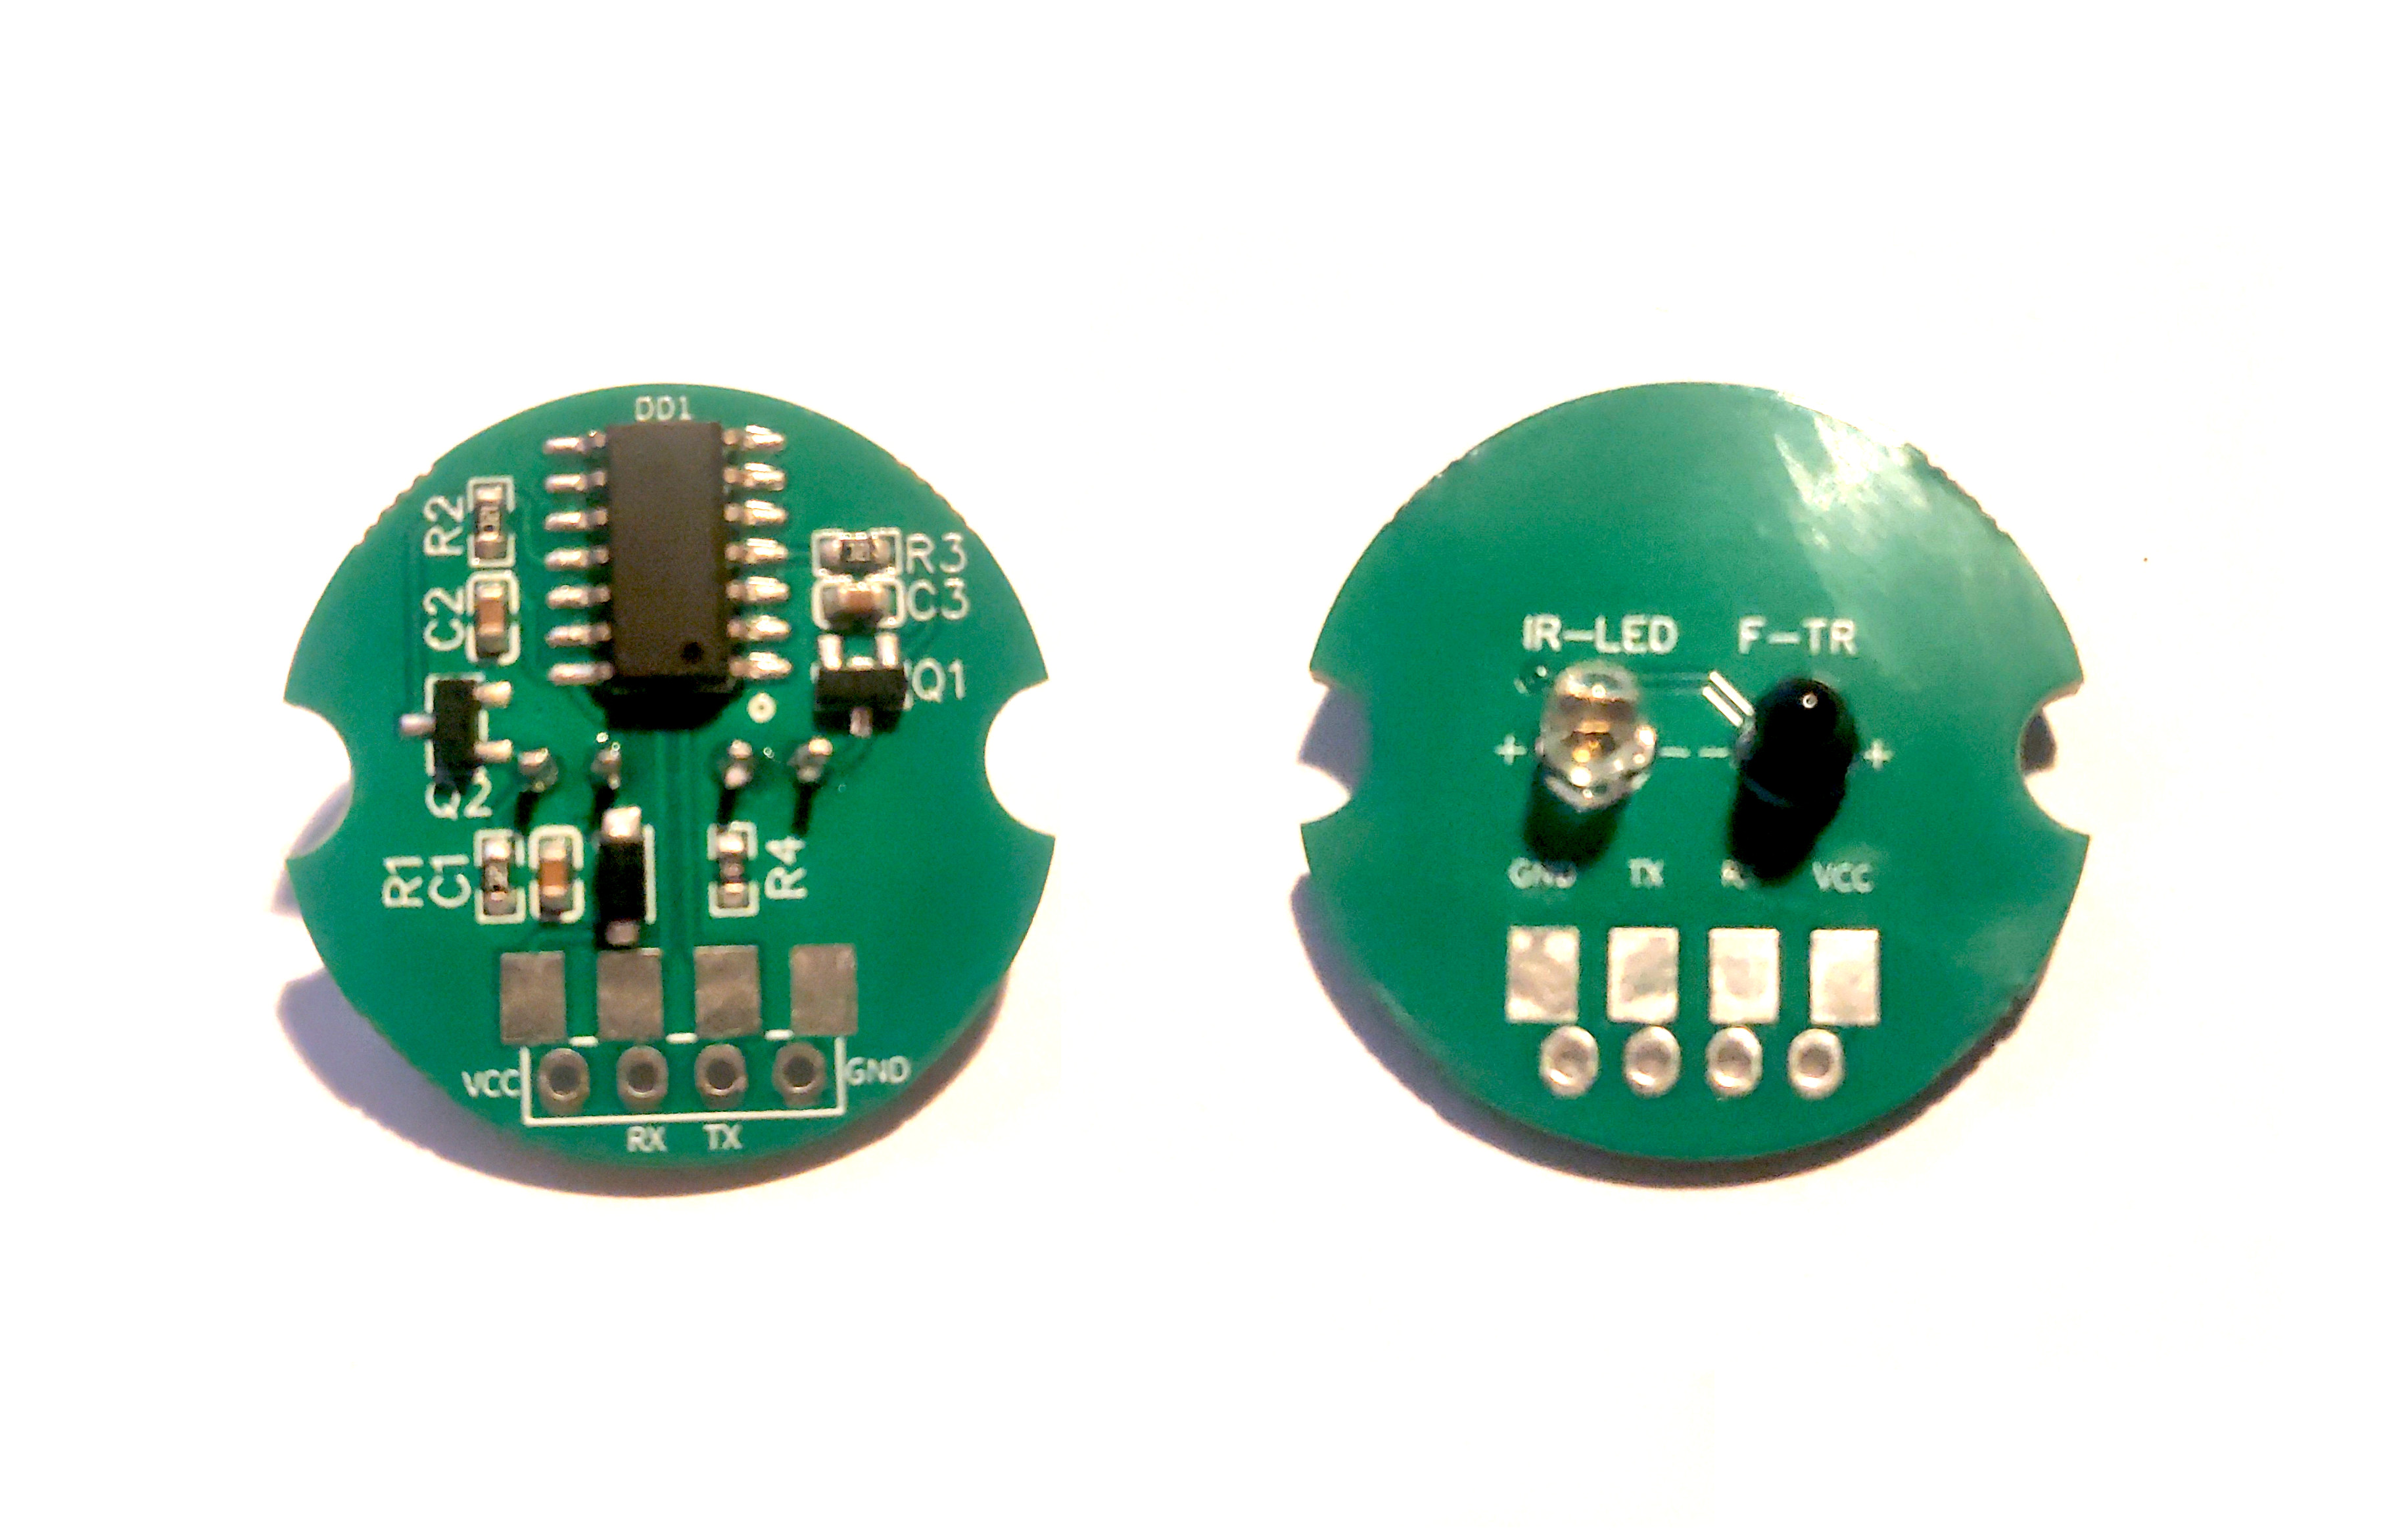
front and back of the infrared transceiver
Wiring
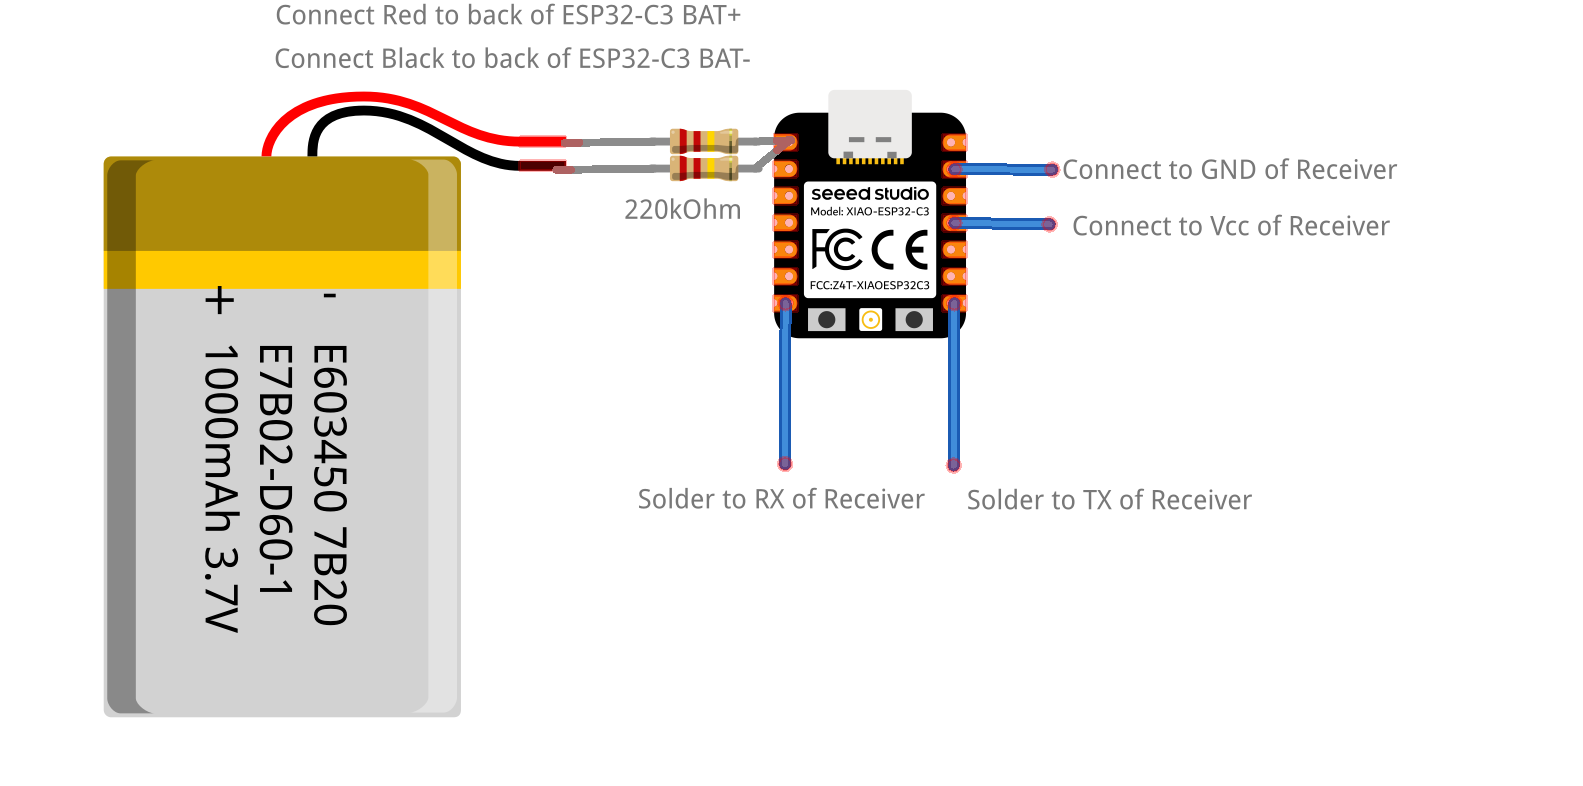
Sketch of the wiring
The above sketch shows how to wire everything. The two resistors form a voltage divider
that allows to measure the battery voltage at A0. Read more in the Seeed Studio Wiki.
Vcc of the receiver is connected to a GPIO pin instead of 3.3V to prevent it draining
energy while the ESP32 is in deep sleep.
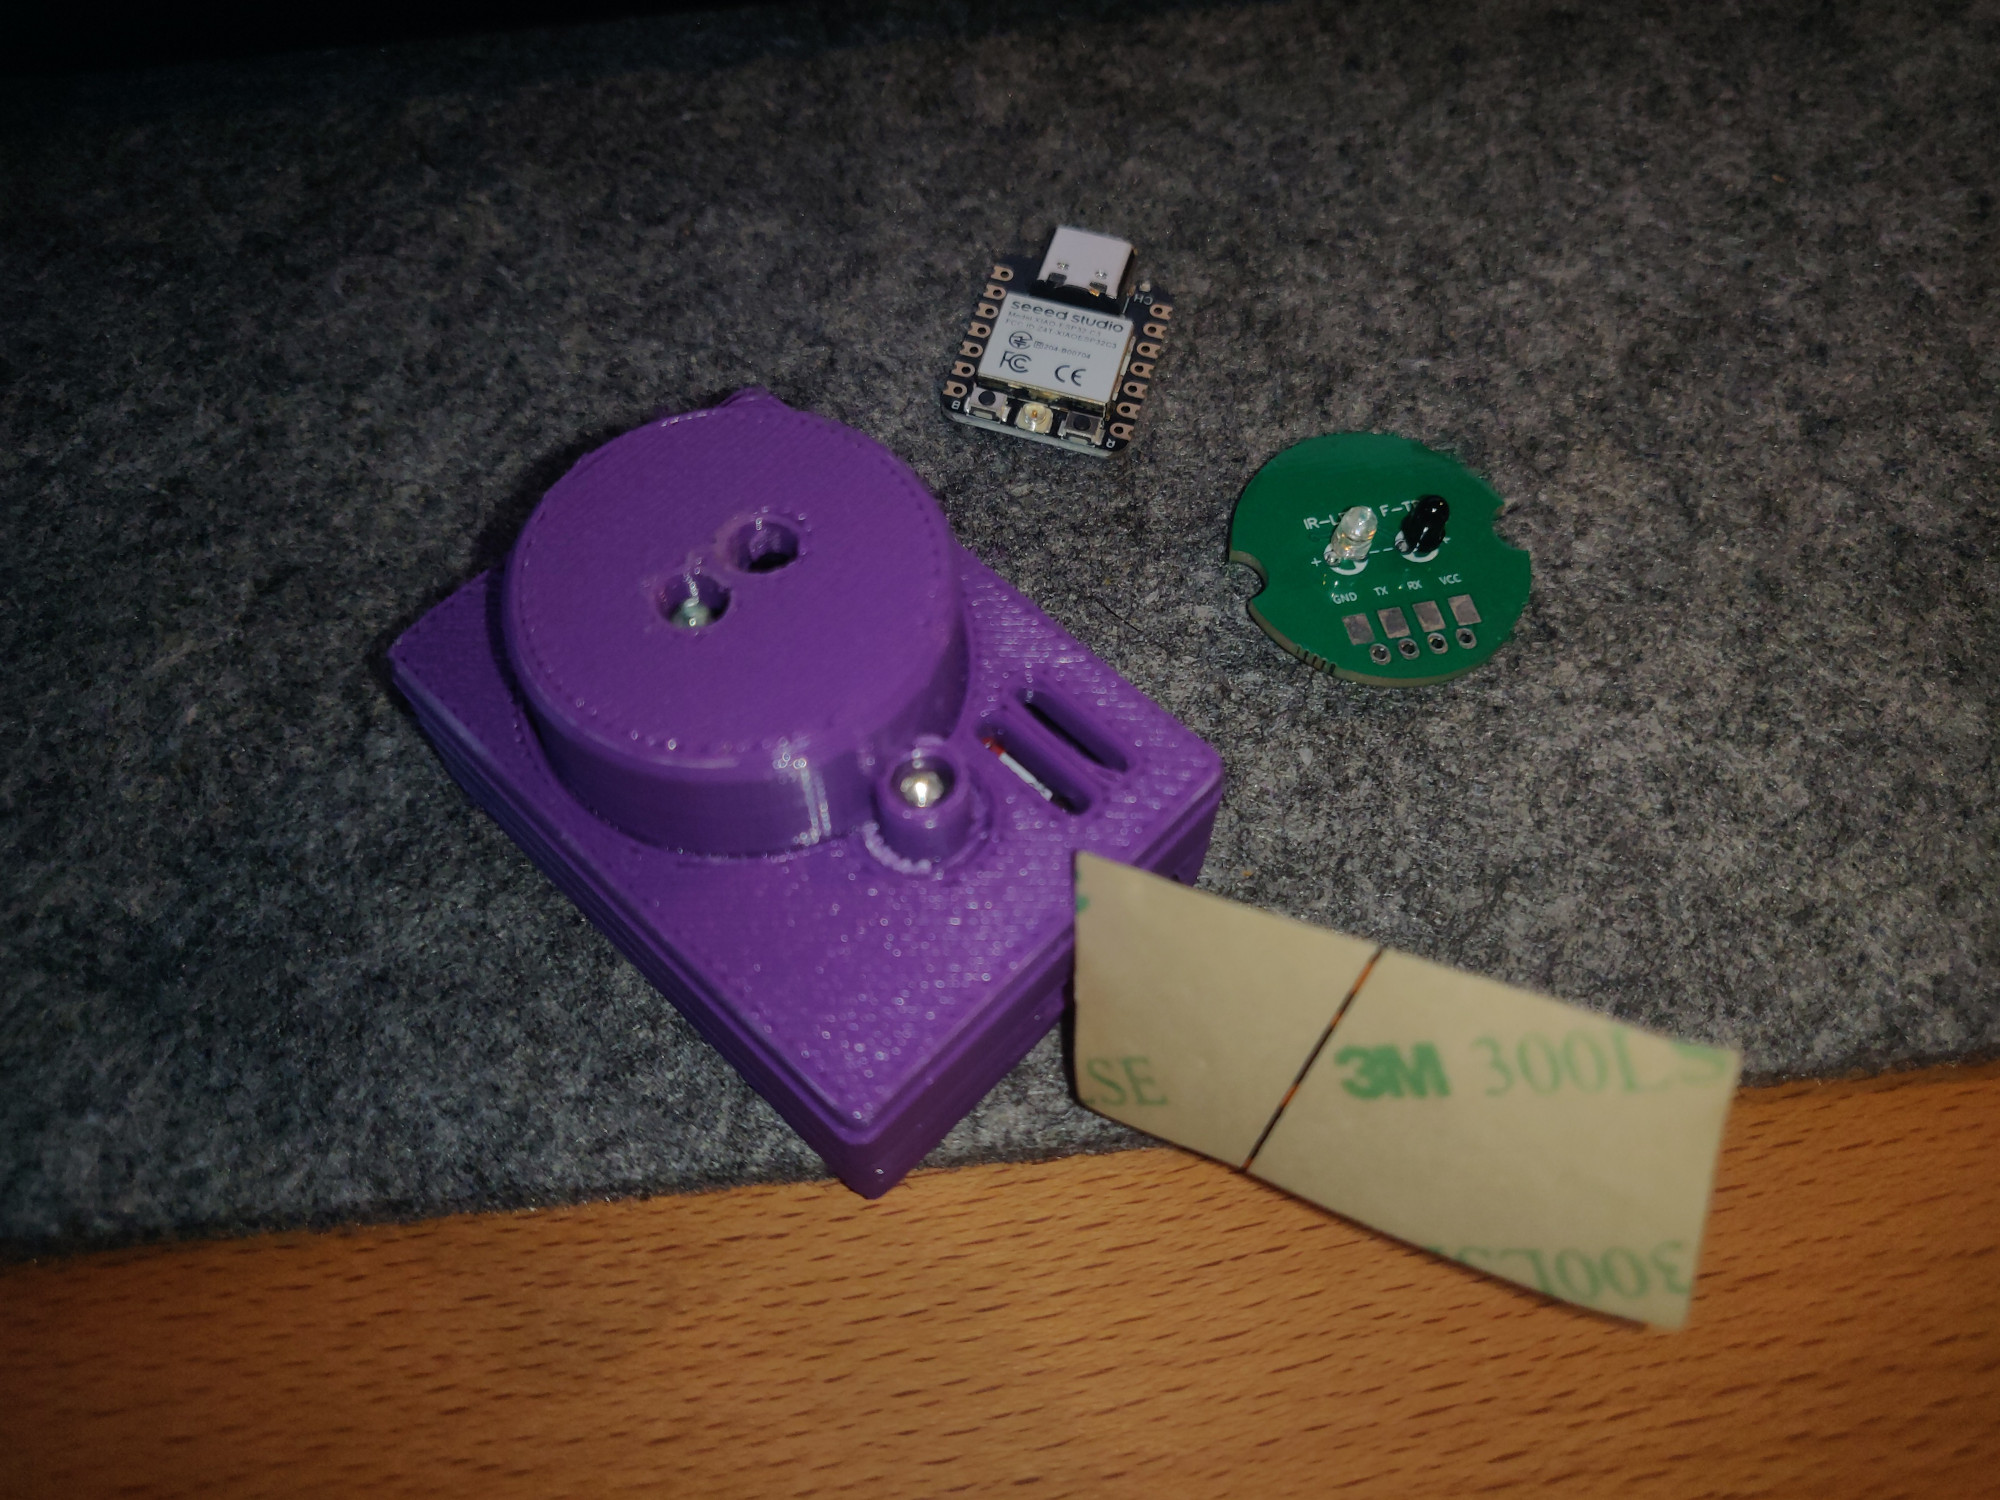
Case
The case consists of three parts and an insulator (check repository for all files).
;
Top
;
Bottom
;
Head
Furthermore, one M3 and two M2.5 threaded inserts are needed together with fitting screws.
Installation

the device attached to the digital meter
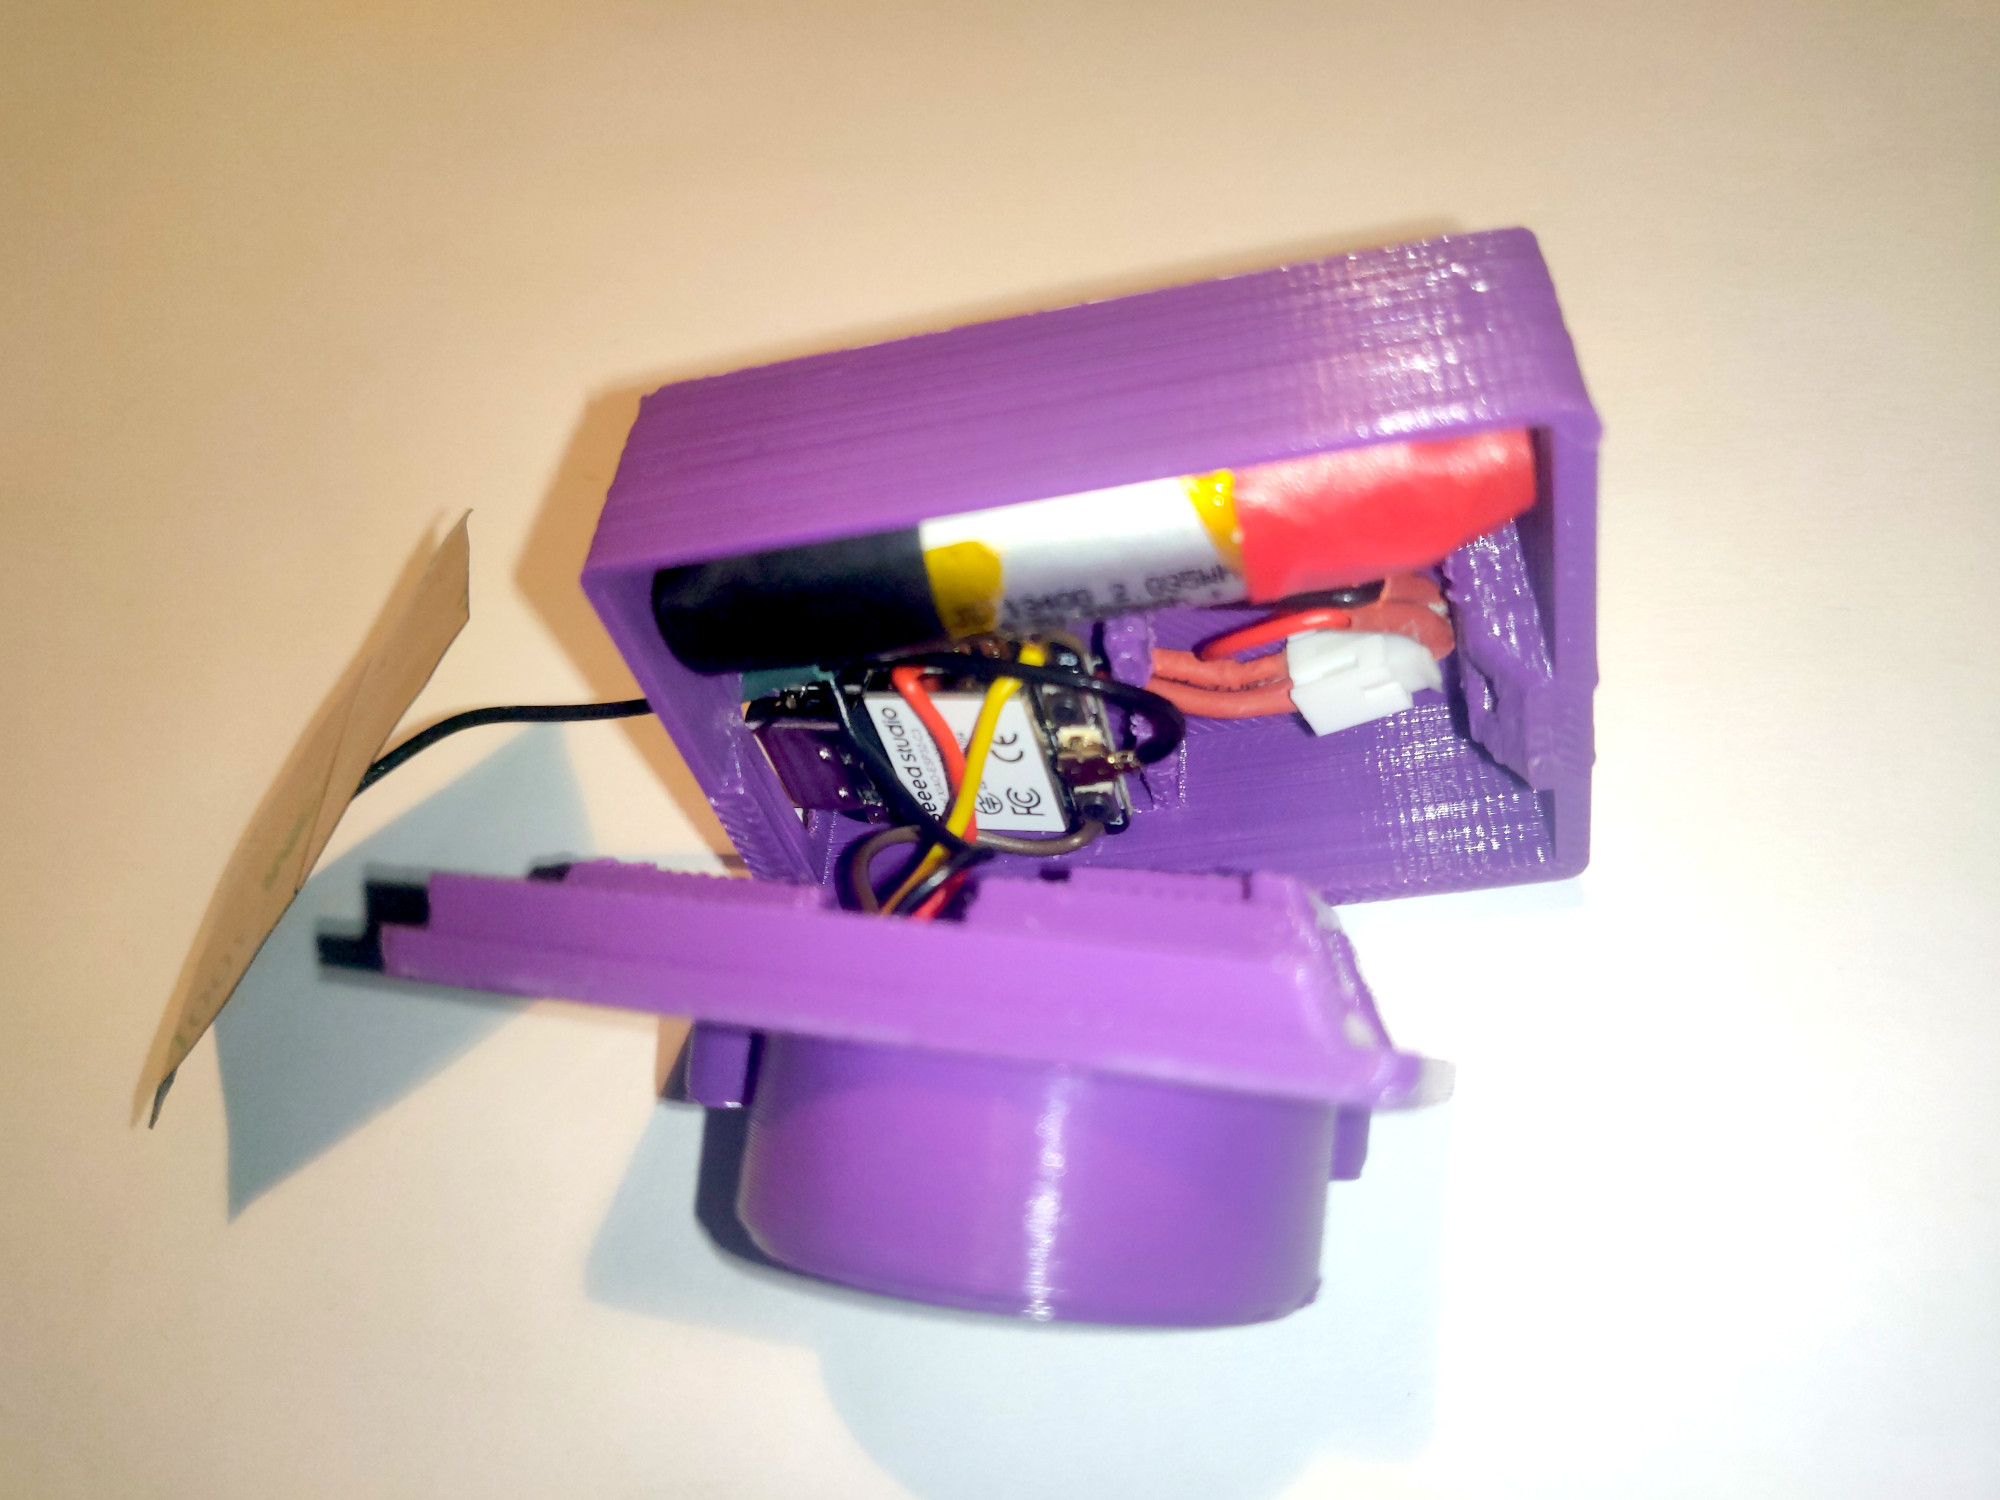
a look inside
Privacy Mode of Digital Meters
Another surprise: The data stream of digital meters are protected by a static pin that one either receives at purchase or you can get it from your distribution network provider (German: “Verteilnetzbetreiber”, e.g. Stadtwerke). It should be enough to call or write an email and you will receive the pin via mail.
Software
You can find the code on GitHub. It only uses features shipped with a current (2024.12.4) ESPHome release. The process is like this:
- Wake up from deep sleep
- Power on the receiver
- Receive SML data, write to MQTT
- Measure Battery Voltage, write to MQTT
- Go to sleep for 10 minutes
For flashing, just follow the standard ESPHome procedure. A complete configuration might look like this
---
substitutions:
  name: smartmeter
  mqtt_broker: 192.168.1.1
  mqtt_username: smartmeter

<<: !include smartmeter.yaml
smartmeter-example.yaml
Make sure that all the secrets are properly defined in secrets.yaml.
Setup and Display in Home Assistant
Setup the MQTT Integration. The device should appear automatically through the discovery.
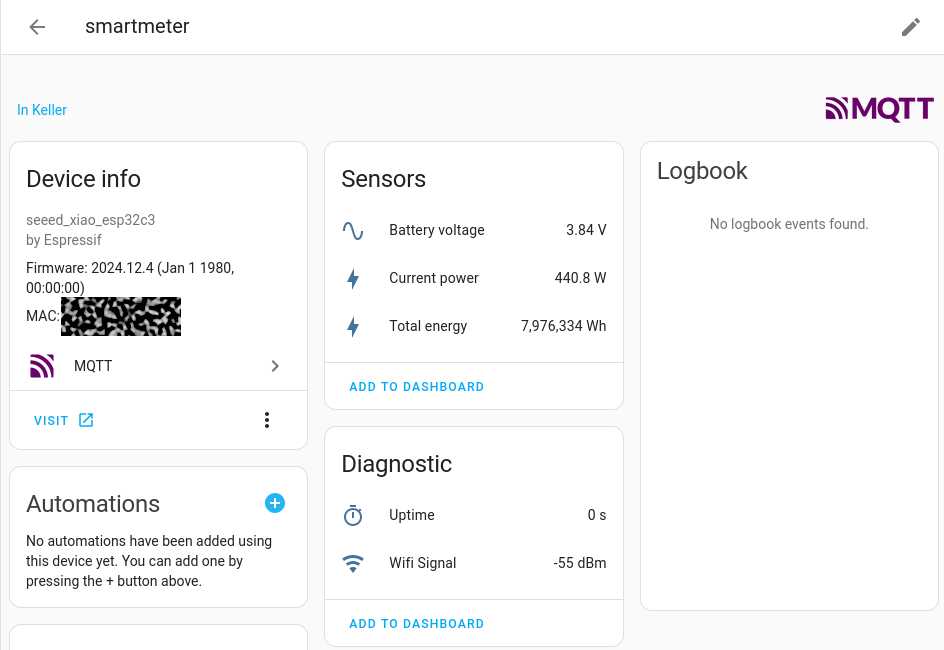
Device View in Home Assistant
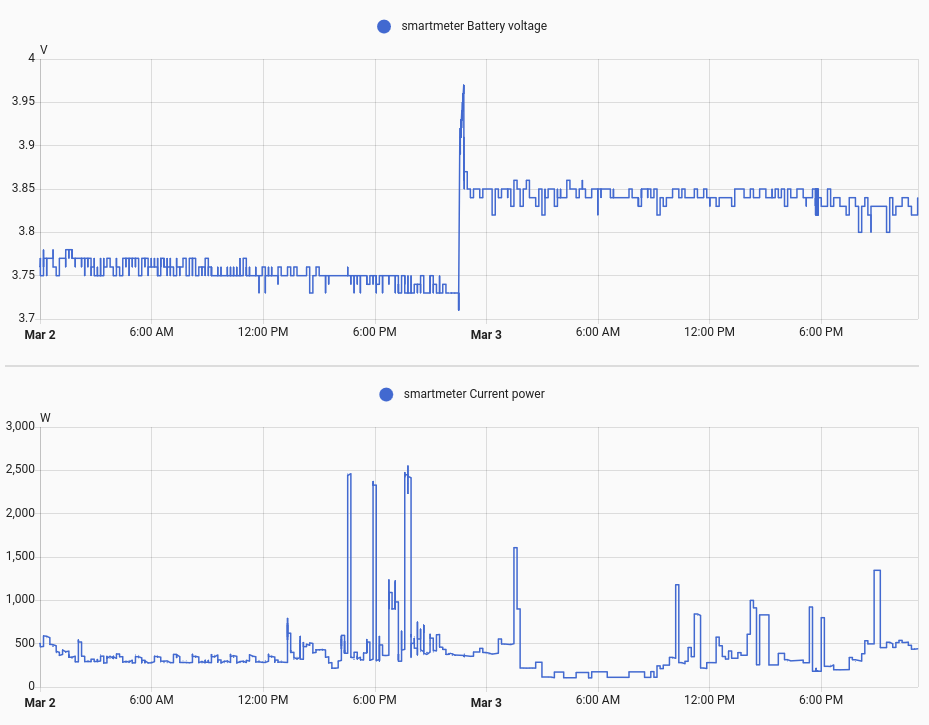
The battery voltage and current power consumption of the meter
In order to prevent the device from going to deep sleep when you want to flash a new firmware, add the following switch to Home Assistant.
mqtt:
- switch:
    command_topic: esphome/ota_mode
    name: Toggle OTA Mode
    optimistic: false
    payload_off: 'OFF'
    payload_on: 'ON'
    qos: 0
    retain: true
    unique_id: ota_mode_switch
configuration.yaml
Conclusion
The device works and I am amazed how fast I was able to put it together. 10 years ago this would have taken weeks to months to realize. But with modern microcontrollers and ESPHome, I was able to put it together in several days. I assume that the 550mAh battery, I was able to recover from the e-cigarette, will last 2-3 weeks. A future design could use larger, off-the-shelf battery such as a 18650 cell which could easily last 2 months.
The device and also previous instances of it gave me interesting insights into my power consumption and energy as a whole, hence expanding my consciousness to how much energy each device and activity requires. For example, I was cooking dinner and used two stove plates and an oven with the power demand peaking at over 5000W! The total energy consumption over the span of 30 mins was roughly 1.5kWh. This knowledge helps me to focus on stove plates that are not switched off rather than feeling bad when I forget to switch of the light when I leave a room. A light bulb nowadays draws < 10W but is visible by the eye which is easy to observe by humans. A stove plate on the other hand draws 1000W+ but is rather unobtrusive unless you get quite close. The same can be said for electric vehicles. A modern electric car consumes 15-20 kWh / 100 km. Going to the supermarket just 5 kilometers away consumes as much energy as cooking a lavish meal afterwards. But in the end, it depends on the lifestyle and constraints of the individual whether energy can be saved using such a device. I might use my bike more often instead of a car but will not stop eating pasta for energetic reasons! But for sure the consumption happens more consciously 🍝.